Picking Your Path to Game-Playing Nirvana
I remember vividly the feeling I had
when I realized I was really going to do this -- that I was really
going to build my own home arcade cabinet! I didn’t really have any
idea of how I was going to get there, but I knew that if others could
do it, then I could, too. All I needed to do was pick my goal, plan out
the steps, buy a few things, and then I’d have my own arcade cabinet.
Nothing to it, right? Well, of course, there were a few minor details
along the way, like actually building the thing. Still, after dreaming
about it for well over a year, there I was, finally getting started!
Now it’s your turn. I’ll walk you through the process from beginning to
end, starting with goal setting and planning in this chapter. Are you
ready? I almost envy you for just starting the book -- for you, the
magic is just beginning!
Where
to Start? Finding Your Muse
The hardest part of any project is
deciding where to start. It's tempting to jump right in and start
hammering and sawing, but a bit of homework now will pay off in the
end. Before you start on your own project, you should devote some time
to browsing the examples of those who have gone before you. At the time
of this writing, there are over 775 examples of arcade projects listed
on the Build Your Own Arcade Controls Web site (also known as BYOAC)
and on the companion CD-ROM for you to see.
Cross
Reference
It's
a fact of life on the Internet that very little stays the same. By the
time this book makes it into your hands, many of the project examples
included on the CD-ROM will have been updated, and many more will have
been added. Be sure to visit the examples page on the Arcade Controls
Web site, located at www.arcadecontrols.com/, for the latest and
greatest!
Some
projects are works of art, and some only a parent could love, but all
have one thing in common: Each was lovingly put together by its creator
and might have a feature or two you wouldn’t have thought of and won’t
be able to live without once you’ve seen it. The bar has been raised
many times during the five years I’ve been involved in this hobby. It’s
unusual to have a month go by without some project inspiring me to
bigger and better things in my own endeavors.
As meaningful as every project is to
its owner, in every field there are those examples that stand out from
the rest. In Chapter 18 you’ll find several arcade cabinet and desktop
arcade control projects to inspire you. Although it’s worthwhile to
browse all the example projects available, doing so can literally take
days! If you’re looking to fast-track the inspiration process, skip
ahead to Chapter 18 and read through those.
Tip
Now
would be a good time to get out a notebook and start jotting down ideas
as they come to you during this process. The number of possibilities in
this kind of project can be overwhelming, so good organization from the
start will help. Be sure to include the address of any project’s Web
site that
you make note of. When it comes time to implement the ideas from your
notes, you’ll want to be able to quickly find the site again to check
up on the finer details.
Choosing Your Goal
By
now you’re probably beginning to realize that there is no one model of
what an arcade machine is. As you browse through other people’s
projects, you’ll encounter upright arcade cabinets, sit-down cocktail
cabinets, desktop arcade control panels, and contraptions that defy
description. How do you decide where to begin? I’ll describe each of
these in the sections that follow, including pictures to help you make
some decisions. Start by asking yourself the questions found in Table
1-1.
Table 1-1
Questions
to Ask Yourself
| Question |
Point
to consider |
| Are
you looking to recapture the full arcade experience? |
Nothing
brings you back to the arcade like a full-sized upright arcade cabinet. |
| Want
the arcade experience but need a spouse’s approval? |
Consider
a sit-down cocktail cabinet that doubles as a piece of fine furniture.
OK, I admit calling it fine furniture may be a stretch, but a cocktail
cabinet can blend into the decor nicely. |
| Do
you have the time, skills, and patience to build a full cabinet? |
If
not, a desktop arcade control panel may be for you. They are
comparatively small and not too difficult to make.
|
|
| Do
you want to start small and work your way up? |
Start
with a desktop control panel that can be incorporated into an upright
cabinet later.
|
| Is
space at a premium? |
With
a little ingenuity, you can make a counter-top arcade cabinet like
those you’d find at a tavern.
|
| Do
you just want to plug in a game console controller and start blasting
away? |
For
about $30, you can build an interface that will allow you to hook up
your favorite controller to your computer. |
Take
a few minutes to assess your personal situation. Do you have a limited
amount of time to devote to the project, or are you in it for the long
haul? Where will you put your creation when completed? Be thinking of
considerations such as these and the questions in Table 1-1 as you go
over your project options.
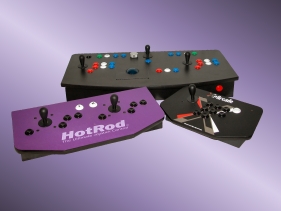
Building a desktop arcade controller
A desktop arcade controller takes the
control panel from an arcade machine and adds a box around it to hold
it and protect the insides (see Figure 1-1). The top panel holds the
joysticks, buttons, and other arcade controls. Inside the box are
the underside of the controls and the electronics needed to interface
the controls to the computer. The back of the control panel has a hole
or holes for the cables that hook into the computer.
Figure 1-1: Several commercial desktop
arcade controllers.
Photos
courtesy of Hanaho Games, SlikStik, and Xgaming, Inc. respectively.
What are the benefits of a desktop arcade
controller?
Building a desktop arcade controller is
a good project for those with a more casual interest in game playing.
You get the benefits of playing with real arcade controls, without
having to lose floor space in the house. I keep a small one-player unit
on my desk for when I get that gaming bug, and I slide it out of the
way when I want to work. Not only do desktop arcades save space, but
you also do not have to dedicate an entire computer system for game
playing. They are also portable for those times when you visit
arcade-deprived friends.
Caution
Warning!
Visiting friends with your contraption or letting them play at your
house can have one side effect: Shortly after playing, the question
“How can I get one of these?” will come up. This is your cue to direct
them to where they can purchase a copy of this book. By no means should
you allow them to borrow your copy. You will need it when you begin
your next design!
Desktop
arcades are also easier to build than full-sized arcade cabinets, but
they can still contain the same mixture of arcade controls. Although
the design and layout work is the same, the woodworking is much simpler
and you don’t have to worry about the audio and video systems.
What
are the drawbacks of a desktop arcade controller?
Desktop
arcade control setups have a couple of downsides. For one, you lose
your desktop space. Wait -- wasn’t I just praising these units as a way
to save space? Well, yes, but it’s relative. You’re not dedicating
floor space, but you are giving up workspace. Even the smaller
one-player units can measure a foot and a half wide by a foot deep, and
the larger units can be 2 to 3 feet wide -- that’s a lot of desk space
to give up!
After
the initial thrill of playing wears off, the realization will set in
that you’re still in front of a computer screen. Playing a game with
real arcade controls on your desktop is definitely fun, but it’s not
quite an arcade cabinet. If you’re trying to recapture the feel of an
arcade, you’ll want the arcade cabinet atmosphere as well as the
controls. Don’t get me wrong -- I think a desktop set is a project
worth building, and I believe I’ll always have one on my desk. It’s
just no substitute for the real thing.
Note
Some arcade game
collectors will scoff at calling a home-built arcade cabinet “the real
thing.” There’s actually a bit of controversy on the subject, with
valid points on both sides of the debate. You’ll find more on this
topic in Appendix B.
Building an arcade cabinet
An
arcade cabinet is essentially a box containing the monitor, speakers,
arcade control panel, and miscellaneous electronics that make an arcade
game work. In our case, the miscellaneous electronics include a
computer that runs the whole operation. Many variations of arcade
cabinets can be found. The following descriptions cover the most
popular of them (see also Figure 1-2).
 Figure
1-2: A few different arcade cabinets.
Figure
1-2: A few different arcade cabinets.
From left: Upright, countertop, and cocktail.
Photos courtesy of Jeffrey Allen, Oscar
Controls,
and Game Cabinets, Inc. respectively.
Upright
arcade cabinets
You’re
probably most familiar with the stand-up, upright arcade cabinet seen
in arcades and convenience stores everywhere. They typically stand
about 6 feet high and have 19- or 25-inch monitors, though later models
can have much bigger monitors. These cabinets will support up to four
players easily, depending on the design of your control panel. There is
also a variation of the upright cabinet called a mini, which is a
scaled-down version with a smaller monitor and cabinet that usually
supports only one or two players. Roughly two-thirds of the
build-your-own cabinets made are uprights.
Cocktail
arcade cabinets
You’re
likely to have spotted these machines also. They are popular in
arcades, and for some reason pizza parlors tend to favor them as well.
These units are about 4 feet by 4 feet square and about 3 feet high.
The monitor rests in the middle of the cabinet face up with players
looking down on it as they play. These cabinets are usually limited to
two players sitting opposite each other and taking turns. About
one-third of the build-your-own cabinets are cocktail cabinets.
Cockpit arcade cabinets
A
cockpit arcade cabinet (not shown in Figure 1-2) is a full-sized
enclosure with a seat included as part of the cabinet. There are fewer
of these than the other types of cabinets made, presumably because of
the sheer size. They are big, typically taking up the space of two or
more upright arcade cabinets. These are usually one-player machines,
though I have seen at least one two-player unit recently. I am aware of
only a small number of cockpit cabinets that have been made by the
build-your-own crowd.
Countertop arcade cabinets
The
last main variation of the arcade cabinet is the countertop, or
bar-top, model. These machines are not much bigger than a set of
desktop arcade controls, primarily being taller and deeper to house a
small monitor. You will typically find these machines in taverns and
bars, hence the name bar-top. They are most popular for trivia and
puzzle games (like Tetris). Again, only a small handful of these
cabinets are made by folks who try their hand at an arcade cabinet.
What will you gain by building an arcade
cabinet?
Building
an arcade cabinet has to be the most rewarding variation of this hobby
you can find. It’s as close to the real thing as you can get without
putting a full arcade into your basement. Depending on the type of
cabinet you make, you can get a full-sized arcade control panel with
genuine arcade controls custom designed for the type of game-play
you’re after. Add a monitor shrouded in darkness that minimizes
distractions and a moderate sound system, and you can immerse yourself
in the arcade experience. There’s also plenty of space available to
have such fancy things as removable steering wheels, sophisticated
speaker systems, and four-player panels.
You
can also customize your software setup to hide the fact that the brain
behind your arcade cabinet is a computer. With a combination of a
front-end menu system and an arcade-themed background and sounds, it’s
possible to completely disguise the non-arcade origins of your
creation. Throw in a working coin door, and you’ll begin to believe
you’re standing in front of a real arcade machine -- one that can play
an unlimited number of games! I’ll go through all of this in later
chapters.
An
arcade cabinet is also much easier to share with your friends,
particularly if it has a two- or four-player control panel. Add music
jukebox software (see Chapter 11, “Audio -- Silence Isn’t Golden”) and
your legally obtained collection of music files, and you’ve got an
entertainment centerpiece for your next party that will be the envy of
your friends. If you have the time and resources, building an arcade
cabinet is definitely the way to go!
What are the drawbacks of an arcade cabinet?
Building
an arcade cabinet is more of an effort than building a desktop arcade
controller. They are also more expensive, running anywhere from the
$500 range for a small project to $1500 or more for the mother of all
arcade machines. Arcade cabinets also tend to suffer from feature creep
as they are being constructed, turning a simpler project into a mammoth
(and more expensive) one. This may not necessarily be a bad thing, but
it does tend to be wearing on your family members’ patience.
Arcade
cabinets can also occupy a significant amount of floor space, and
unlike desktop arcade controls, they cannot be put away when not in
use. They also require dedicating a computer system solely for their
use in most cases, although a couple of folks have managed to make do
with external laptops or shared computers. Assuming you’ll be
dedicating a computer to the project, you’ll need to factor in the cost
of any computer components you need to buy for the cabinet.
Tip
If
you’ve owned a computer for a while, the odds are that you’ve upgraded
at some point and have an older computer lying around. These computers
make excellent starting points for arcade cabinet projects. They will
limit you to somewhat older games because of hardware requirements, but
there are still hundreds of games that are great additions to an arcade
cabinet. Using an old computer also makes an excellent bargaining point
when trying to convince a reluctant spouse. You can always upgrade
computer parts once the cabinet is built.
Buying your way to gaming Nirvana
For
every build-your-own project in this book, there’s an already-made
solution you can buy instead. Since I became involved in this hobby, a
variety of vendors have cropped up who are eager to sell you what
you’re looking for. They can be sorted into two categories -- small
shops building products in their garage, and large operations that have
added new product lines. I’ll present a look at offerings from both
types of vendors in Chapter 17, “Buying Your Way to Gaming Nirvana.”
The
smaller shops tend to come and go, although a few have stood the test
of time. These vendors are usually much more willing to customize their
products to your design than are the larger operations. They also tend
to offer better customer support, because the person you contact for
assistance may also be the person who built your product in the first
place. They tend to have slower shipping times, however, due to the
realities of being a smaller operation, and are often more expensive.
The
larger operations have the benefit of mass production, financing, and a
distribution infrastructure such that they can get their products to
you faster than the smaller vendors. Their product lines are fixed,
however, and they are less likely to be willing to customize a solution
for you. At least one large vendor has been known to do customizations,
so it never hurts to ask. Support from a larger company can be hit or
miss, with some vendors providing faster and better support than
others. Pricing should also be lower from a larger vendor.
What do you gain by buying?
If
you’ve got the money, but not the time or patience to build your own,
buying a pre-made product can be a great solution. You’ll get a
professionally made piece of gaming equipment that’s attractive and
comes with a warranty. If it stops working, there is someone you can go
to who’s responsible for getting you back in business. Depending on
your access to tools, and factoring in what your time is worth, it may
actually be cheaper to purchase rather than build your dream arcade
machine.
What do you lose by buying?
Although
it can be less expensive to buy rather than build, that’s not often the
case. If you already have access to the tools needed, and have the
available spare time, you will probably find it cheaper to build rather
than buy. There’s also the flexibility of being able to customize every
facet of your design. Finally, there’s a level of satisfaction at being
able to say “I built it!” that you obviously won’t get with a purchased
product.
Tip
If
you decide to buy rather than build, take some time to do a bit of
research first. Log on to the Build Your Own Arcade Controls message
forums (www.arcadecontrols.com/)
and the alt.games.mame newsgroup (http://groups.google.com/groups?q=group:alt.games.mame)
and ask for opinions on any products you are considering. Also, pay
with credit card if you can, and insist that your card not be charged
until the product is shipped.
Caution
Although
we try to keep the Build Your Own Arcade Controls message forums family
friendly, an occasional bad apple can slip through. Also, the
alt.games.mame newsgroup is an unmoderated Internet newsgroup that is
not owned by anyone, meaning people are free to speak their mind as
they see fit. You get straightforward opinions, but the language can be
colorful at times.
Thinking point
Take
a moment to stop now and think about what we’ve covered so far. If
you’re planning to jump right in, you should try to make some decisions
based on the above material and narrow the scope of what you’re
attempting to create. Do you know what type of project you want to
undertake? Have you assessed the time and money you can devote to the
project? Are you going to build or buy? As you begin to pick a plan,
buy materials, and lay out your designs, you’ll begin to limit the
number of changes you can make midstream. By no means is change
impossible, but it does become inconvenient in terms of time and
expense. If you’re planning to read the book through first and then
begin your project, you can safely postpone thinking at this point!
Plan, Plan, and Then Plan
Some More
So where do you go from here? As a friend of mine is fond of saying,
“Proper planning prevents poor performance!” You need to make a few
decisions before you proceed. There’s a bit of the chicken-and-egg
syndrome coming up. It’s hard to make planning decisions without
knowing more about the various options available, but I’ve tried to
gear this book toward your being able to jump right in without having
to read it through first. In the next few paragraphs, I’ll point you
toward later chapters for additional information or inspiration for
planning purposes.
However,
if you’ll trust me, there’s already a plan in place over the course of
the book. When all’s said and done, you’ll end up with a nice
two-player upright cabinet ready to play. If that’s the route for you,
you can skim over the next piece and then jump in to Chapter 2.
Deciding to build or buy
At
this point I hope you have a general concept in mind for the kind of
arcade machine you want. This would be a good time to consider the
build-or-buy decision. You may wish to skip ahead to Chapter 17 to
browse through the various commercial offerings to see if one of them
will fit the bill. Don’t forget to factor the costs of buying against
the time and costs of building.
Planning for controls and interfaces
I’ll
go over the various controls and interfaces in detail in Chapters 3
through 10. Still, you should be able to make some preliminary choices
now. How many players do you want your cabinet to support? If you’re
just starting out, a two-player cabinet is probably your best bet.
However, if you have a favorite four-player game (and three friends who
you know will come play), then a four-player cabinet might be your
goal. You don’t really need to make any decisions regarding the
interface just yet, other than planning to leave some space in your
control panel for it. Figure about a 4-inch by 6-inch area inside the
control panel for the interface.
Cross-Reference
An
interface in this case consists of the electronics or other device used
to connect the arcade controls to the computer -- something that
translates the signal that the arcade controls generate to something
the computer understands. This topic is covered in detail in Chapters 7
through 10.
Picking software
Most
of this area can be left until much later in the building process.
However, at this point you need to take into account a few
considerations that can make a difference in how you proceed. If you
want to play a particular game, think about the kind of controls it may
require. For instance, if the newly re-released Centipede is your cup
of tea, you’ll need to plan for a trackball. The majority of games will
run fine with a couple of joysticks and a bunch of buttons, but do
consider any particular game favorites before you start building.
The second software consideration that
may alter planning is the operating system choice. This will primarily
affect your interface decisions. Almost every interface option will
function in a Microsoft Windows or MS-DOS (or MS-DOS-compatible)
environment. If you’re planning to use Linux or a Mac, however, then
you’ll need to investigate the interface’s requirements before you
proceed. Also bear in mind that more computer games are written for the
Windows platform than any other. Arcade cabinets have been made with
both Linux- and Macintosh-based systems, but unless you have a specific
reason to do otherwise, running a Microsoft operating system will be
your best (easiest) choice.
Trivia
My
recommendations have nothing to do with the capabilities of Linux and
Macintosh. I’m a big Linux fan, using it both personally and
professionally. I also have a lot of respect for the Macintosh and its
capabilities. Please don’t flood me with e-mail pointing out the error
of my ways regarding my operating system choice. Constructive criticism
is, of course, welcome!
Figuring your budget
Now
is the time to decide how much you’re willing to spend on this project.
This as much as anything else will determine what kind of project
you’re able to build. Planning for the mother of all arcade machines on
a limited budget may be an exercise in frustration. However, with some
careful thinking, you can lay the infrastructure for your dream machine
and build it up slowly. A two-player panel now can be swapped out for a
four-player panel later, when you have the financing to buy all the
required parts. A low-end computer can be upgraded to a high-end
computer later. About the only choice that’s not alterable is the
physical construction of the cabinet. For instance, you might only be
able to justify buying a 19-inch monitor at the start, but have a
25-inch monitor in mind down the road. In that case, be sure to build
the cabinet wide enough to support the larger monitor later!
Putting it on paper
A
goal without a plan is but a dream. A plan is only as solid as the
paper it’s committed to. Now that we’ve hit the end of the chapter,
take the time to write down any thoughts and decisions you’ve made. Be
sure to keep references noted as well, such as page numbers or Web site
addresses for later referral. This may save you frustration in the long
run. Continue this habit as you proceed through construction.
As
a side note, near and dear to my heart is the creation of Web sites. If
you know about creating Web sites, or even think you might want to
learn, consider keeping a construction diary. Take plenty of pictures
as you go and accurate notes. This will not only help you if you need
to refer back for any reason, but, if you put it up on a Web site,
might just also be the inspiration for the next person who decides to
build his or her own arcade machine!
Tip
Start
a separate sheet of paper devoted to your budget. Keep track of every
single expense so you can keep an eye on the bottom line. It’s amazing
how quickly those “quick trips to the hardware store for a few screws”
can start to add up. Of course, if you’re hoping to hide the evidence
from a spouse, this step is not recommended!
Summary
You
have a lot of choices ahead of you, all of which lead to guaranteed
fun! An upright, cocktail, or countertop arcade cabinet will make a
great addition to a family room or game room. If space is at a premium,
you might choose a desktop arcade controller. Whichever you decide
upon, proper planning will help ensure success. Whether you choose to
build an arcade cabinet or a desktop controller, or buy your way to
gaming fun, this book will guide you along the way!
Speaking
of plans, that’s just one of the things I’ll cover in the next chapter,
where you get to jump right in and start building your arcade cabinet.
The magic’s starting, so let’s go!